Friday, November 18, 2011

Etching Workshop

Today was an awesome etching workshop at Caroline's studio in Falls Church:

Thanks to (l to r): Sharon, Ellen, Caroline, Sandra and Odaybea for coming!! (and me, Dana!)


Odaybea etched her sterling silver cuff using a couple of PNP images which she ironed on, then she painted on a layer using an oil-based paint pen, and carved out some text. A scribe or the end of a file work great for carving out the resist.


Here is a progress shot of Odaybea's cuff.


Sandra created a sheet of images, with several layers of etched images- here 1/2 is done, 1/2 is in progress. Nail polish also makes a great resist. She used Rio Grande's new silver/brass bimetal- also known as silver filled. The possibility exists to etch through one side, revealing the alternate material. Gotta try that!


Ellen's etched pieces were created with PNP paper with the exception of the bottom right starburst which was created with a paint pen resist.


Ellen's Greek Gods turned out awesome.


Sharon's pieces were created with PNP paper. Can't you see some soldered-on stone settings in their future??


Dana's top right piece was created by utilizing nail stamps, bottom. The above left piece is a work-in-progress.


Dana's pieces using nail stamps and PNP paper.


Some recent work came in too! Here's a peek at Ellen's beautiful pieces- some still in progress.


Sharon's recent pieces are about to make their debut appearance in her NEW etsy shop- best of luck Sharon!!

I missed taking Caroline's etchings! Maybe we'll post them once they're all done- everyone send me photos of these pieces once you've used/finished them!!

Thursday, September 22, 2011

Meeting at the Ratner Museum

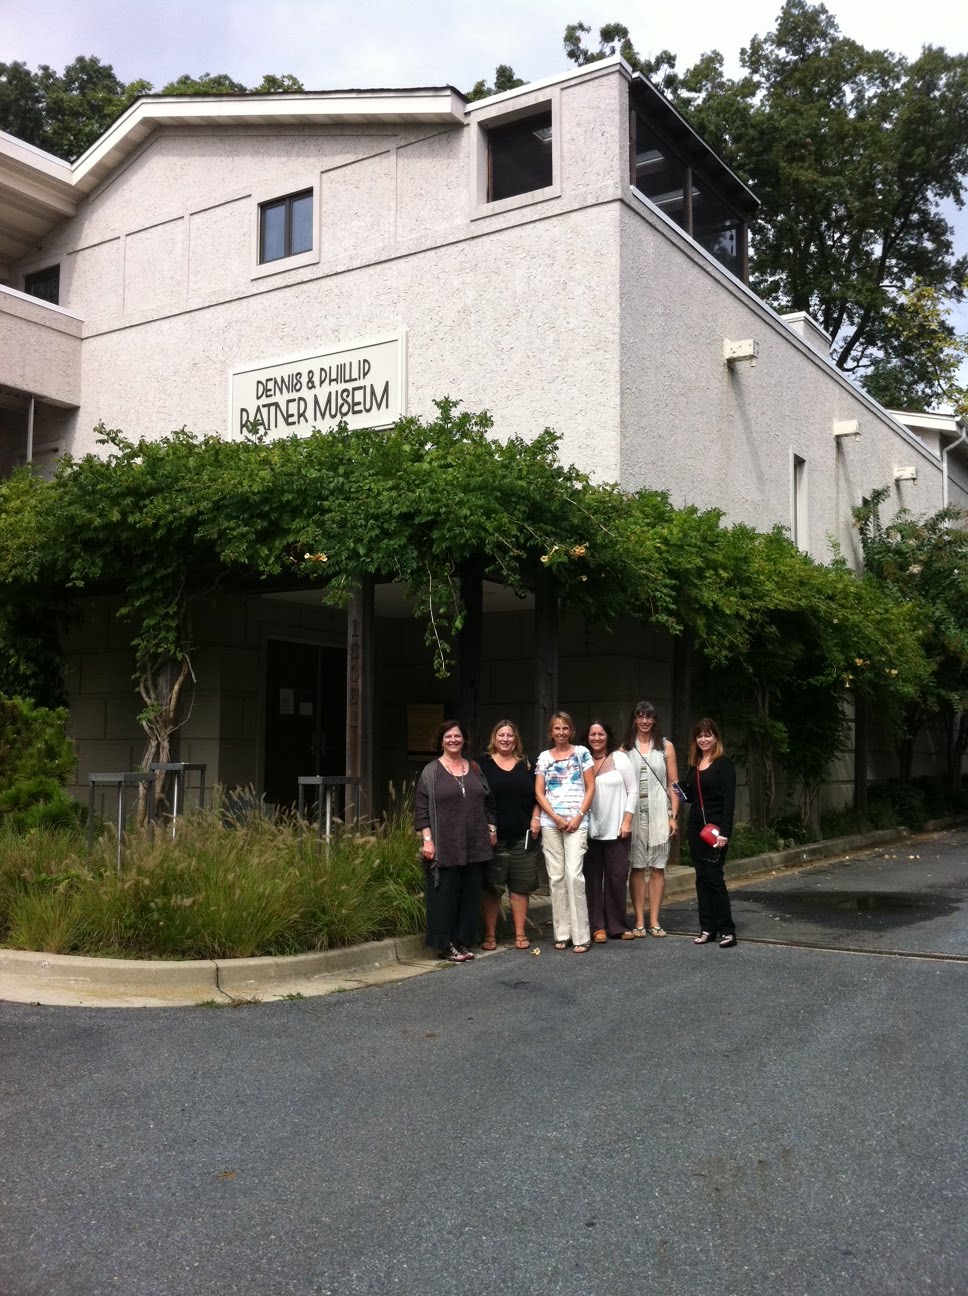
This is a pic of the Ratner Museum in Bethesda Maryland. Very nice! Ellen K's family owns this beautiful gem and we were lucky to get an "inside" tour!

Here we are in front: Mimi, Sharon, Bodil, Sandra, Karen, and Ellen K. (plus me, Dana)


Another great shot of us!


Ellen treated us to a overview of dentistry tools she uses in her profession but also in her metalsmithing!


Here we are meeting in the carriage house of the Ratner Museum.


The first floor of the Ratner Museum. A large square area that showcases 4 artists per month. The upper level is the work of Phillip Ratner.

Friday, June 10, 2011

June Meeting; Calendar Ideas

Dana, Ellen Y., and Jowita, with calendar pics all over the floor! (this and next 4 pics by Karen)


Caroline, Ellen, Sharon, Bodil and Dana.


Thanks so much to Karen for offering up her lovely home so we could gather, chat, eat and discuss ideas!Ellen K., Karen, Caroline, Ellen Y., Jowita, Bodil and Sharon (and me, Dana!) chatting and comparing jewelry pics...


Laying out photos of our work to see what we got.


Discussing monthly "themes" for our first calendar. Hopefully not our last! (Karen, Caroline, and Ellen K.)


Ellen Y. and Jowita.


Sharon and Bodil.


Tuesday, May 31, 2011

Jewelry as an excuse

When I'm not making jewelry (or raising a child or doing chores or hiding behind a book), I like to go antiquing. It's a bit of a sickness, actually. I feel antsy if I haven't done it in awhile. Pathetic, right? So I decided to come up with a good excuse to go out antiquing every now and then: using antiques in jewelry. I specifically like old signs, graphics and advertisements, so I'm often drawn to old packaging and tins. I have a decent stash of items now, including these guys:


Currently, I'm figuring out how to use them in my work. I obviously mean for most of these pieces to be fun and tongue-in-cheek -- anti-midge cream! -- but I think it's possible for jewelry that incorporates these tins to be lovely. Exhibit A:


I found two old orange juice cans that have wonderful color and graphics. I've already cut one apart and started marking it up with my Sharpie. I have a rectangle and oval or two in there, but as you can see I've mostly marked circles. Yes, that means the dapping block is coming out. I saw a pair of earrings that gave me my first idea on how to use the cut-up juice tins, dapped to a concave shape, in a "pretty" way. I'll post them when I finish.

Do any of you marry another love with metalsmithing? I'd like to hear about it. Especially since I'm already plotting how to involve yet another love of mine: letterpress printing.

Sharon

Tuesday, May 24, 2011

On the "Drawing Board"- What's on Yours??

This week I'm trying to make a couple of things, since I went to the gem show this weekend and bought some new goodies. I have a lot of stones. I don't need anymore for a while. But, it's nice to have new things.This will be a pair of post earrings featuring a matched set of amazonite stones and the last of some square fire opal. I love using things up and thus clearing out space for something new in my stone box. Square stones are killer when it comes to creating bezels- not my favorite. Probably that's why I've had them for a few years! But if I get all the bezels made today, then tomorrow I can solder, set and polish. We'll see....!

And here are the finished earrings:

What's on your "drawing board?"

Friday, May 20, 2011

May Meeting

Here we all are in our gorgeousness (l to r): Karen, Ellen, Sharon, Mimi, Jovita, and Bodil (and me, Dana, taking the pic!)

Today's meeting was great- sitting around the kitchen table at Bodil's house eating, drinking and chatting! AND looking at everyone's jewelry! We talked about creating a calendar for us Ladysmiths of our work- a portfolio of sorts, and it will be created for our own use or to give away. Fun!

See everyone next time!

Friday, May 13, 2011

Next Get-Together

See everyone at Bodil's house next Friday for a meeting to chat, look at recent work, and hang out. Hope you can make it! Email me for more info...

Wednesday, May 4, 2011

Mokume Gane Ring

This is a ring I made today for my mom, to give to her on Sunday for Mother's Day. Her birthstone is sapphire, and this is a 7 mm stone I'd bought last year for this purpose. She likes jewelry that is small and delicate, whereas I prefer bolder jewelry. I hope mom will like it! This was as small and delicate as I like to go!

The construction was straightforward, but since I was using a piece of 20 ga. mokume gane ("woodgrain" in Korean) of silver and copper, I was sure to make a template of my piece in copper first to make sure of the pattern I wanted. Mokume gane is a bit pricey, but you use small amounts of it at a time so it's not so bad. After sawing out the shape, I soldered the ends of the ring together. This is where things got funky! When I began soldering the seam closed, the seam actually opened up the hotter it got. Then when it cooled back down, the seam came together again. WEIRD! I figured it was part of the properties of this mixed metal. I actually had to use 2 sets of tweezers to hold the seam together, with the torch free-standing and the solder snippet carefully balanced on top of the seam. That "seamed" to work and when I soldered on the setting for the stone, nothing unusual happened.

I used liver of sulfur (LOS) to give the piece a patina. The problem with LOS is that it also darkens the silver. There is a solution called Baldwin's Patina (sold by Rio) that I need to buy! It only reacts with the copper and darkens that part. Once my mom tries it on, I will see if I need to re-size it, and if so then I will bang the back on a mandrel to stretch out the metal. I will also re-patina it with Baldwin's. That will really bring out the pattern and it will not look so funky as it does now.

Friday, April 29, 2011

Poor Man's Julie Shaw

This is a necklace I put together this week using a pendant I'd made. I've always liked the way opals and peacock grey pearls look together. I made an s-clasp and put on a length of chain so it could be adjustable.


It was inspired by a ring by Julie Shaw (see below right). I love how she uses the mixture of stones, gold, and liver of sulfur on silver, to bring out the most amazing colors. You could say mine is a poor man's version! I used a silver-copper sandwich slice instead of gold, and textured the other side of the setting with punches, much as she does. I did use liver of sulfur, but I dulled it a bit because I didn't want it to blend in too much with the color of the pearls.


You can find more of her beautiful designs at JulieShawDesigns.com.

Saturday, April 23, 2011

Student Work

This was a project completed by one of my students, Barbara, at the Lorton Workhouse. She is an artist-type, dabbling in this 'n that. She thought she'd try traditional metalsmithing, as she had just taken an enjoyable seminar or two with Carol Hamilton, also at the Workhouse, learning about metal clay.

She started to lose her hearing in her 30's, and hence now wears hearing aids. She wanted to create a pair of hearing aid guards, so when she went outside on windy days, her aids would not be howling from the onslaught of wind and air. They were to be functional, but also beautiful. She worked on creating templates of the earpiece, and then cut out, filed, sanded, and domed the sheet silver. Next she created coils in silver twist-wire, and after many soldering operations, soldered on these coils to the sheet silver. They are reminiscent of the ear, aren't they? She used a brass brush (leftover from her silver clay class) to burnish them, and then folded the wire around her ear; one left long enough to attach back up the front of the earguard.

Here's a picture of Barbara modeling her hearing aid guards. I was so struck by how elegant, personal and meaningful this project was to her. This was not an easy project- it took her many hours of forming, soldering, melting (oops) re-doing, etc... before she "got it", but she didn't give up. They're so chic, industrial, organic, and eye-catching, aren't they??